Vietspices Search

Thursday, January 27, 2011

Nem Chua (Cured/Fermented Beef)


"...Mừng ngày Tết ta chúc cho nhau
Một năm thêm sung túc an vui
Người nông dân thêm lúa thóc
Người thương gia mau phát tài..."

Next on our Tết menu is Nem Chua. This savory, addicting Nem Chua  is usually served as an h'orderve with raw garlic and fresh chili pepper. It has a sweet, sour, salty, spicy taste with a rubbery texture.  And once you have tasted one, you cannot help but continue, until you realize your tongue is on fire.

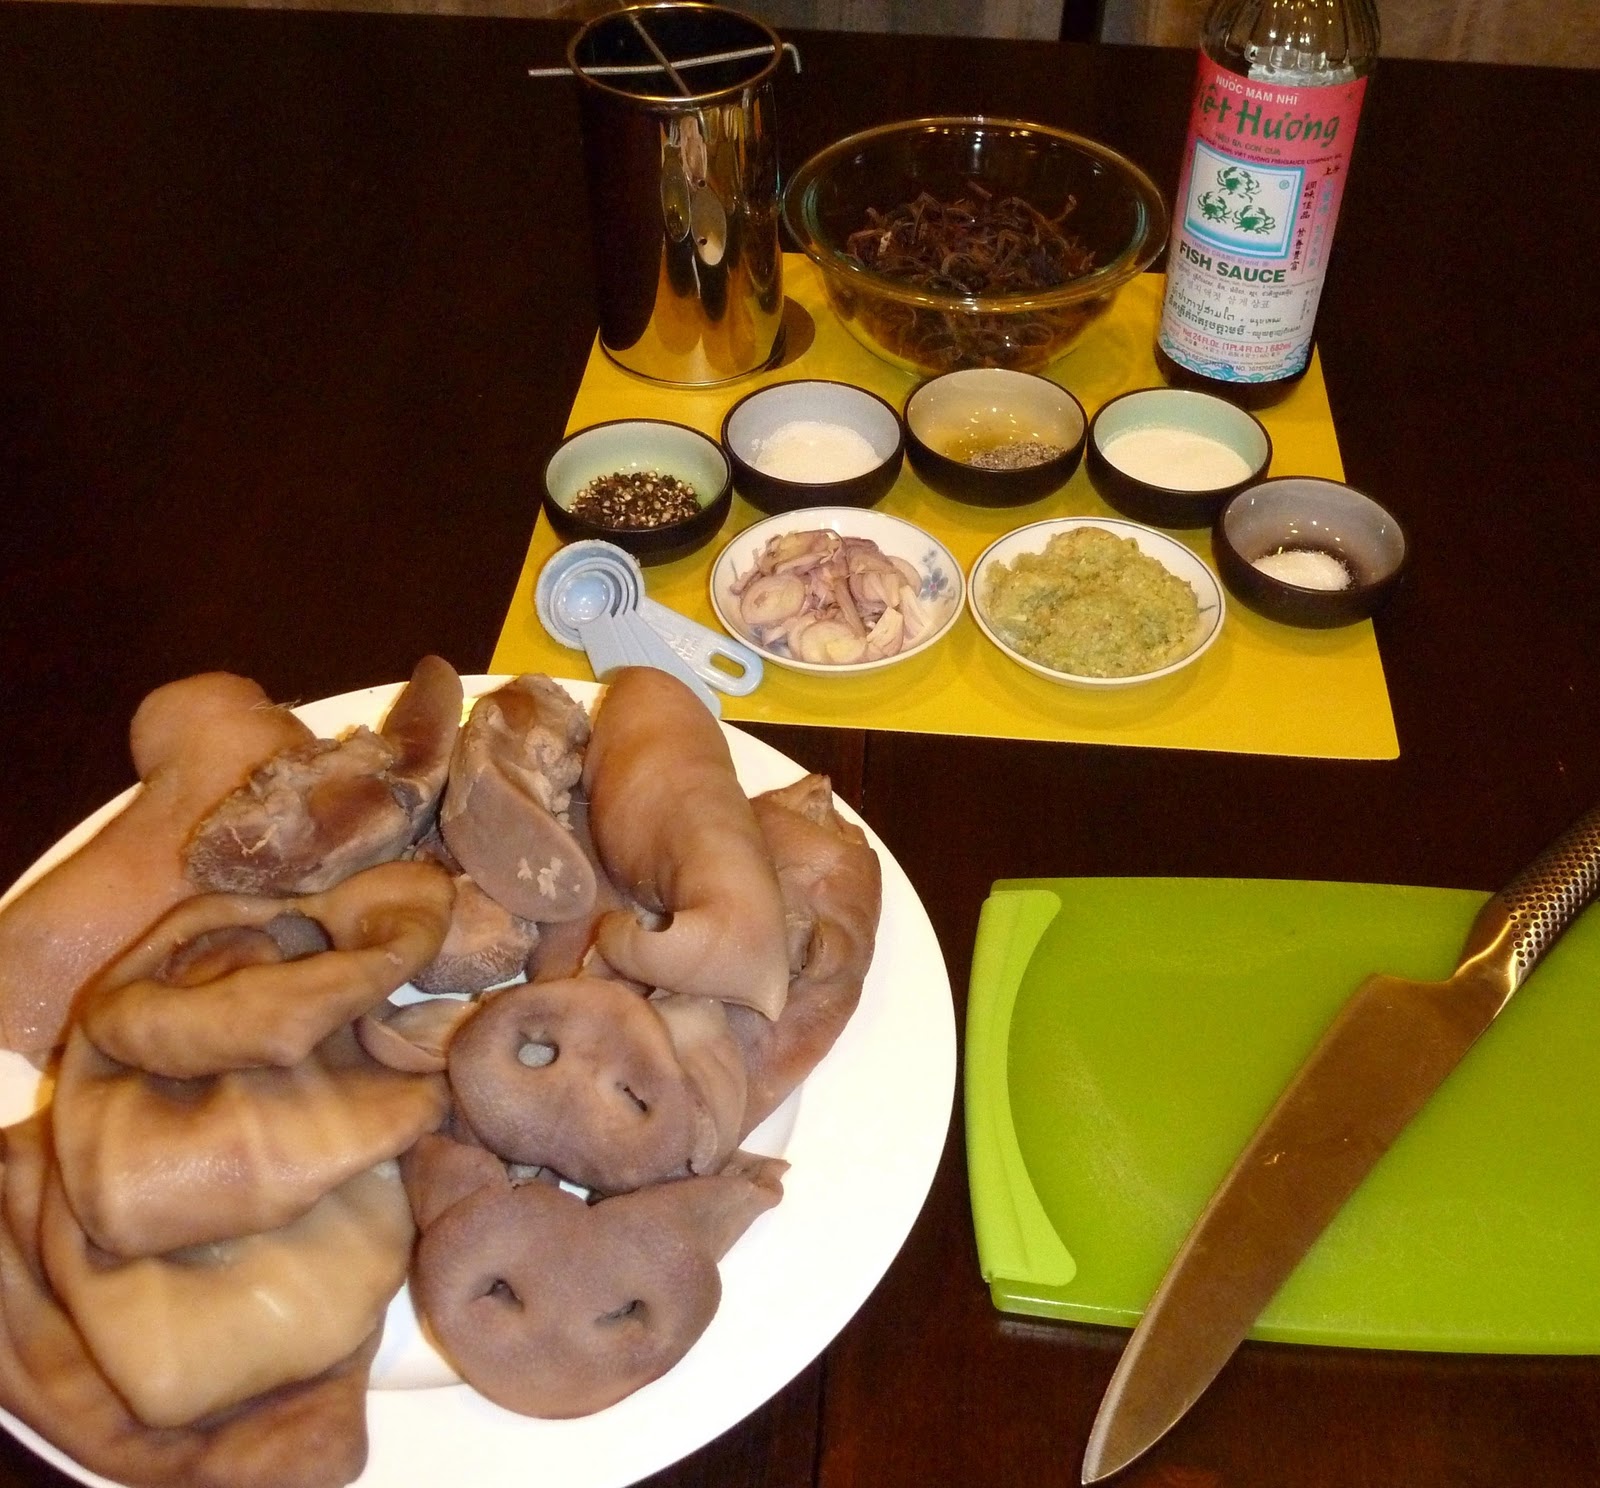
Traditionally, the main ingredients are minced pork, shredded  pork skin and a mixture of seasoning.  The mixture is then wrapped in a thin layer of an aromatic, fresh leaf of guava (lá ổi),  or Otaheite gooseberry leaf  (lá chùm ruột), then in another layer of banana leaf; it's then formed into boxy roll. These rolls are then stored for the natural fermentation process for a few days in a cool place before they are ready to eat.   You can either eat it from the leaf or charcoat grill it. 


Instead of pork, I made a batch of beef Nem Chua as it's safer for my children to eat and it also takes less days to cure it.  The recipe below can be used   for both Pork and Beef Nem Chua
* * *
*
RECIPE: Nem Chua


Ingredients


3 lbs of extra Lean Beef or Pork, ask the butcher to ground three times
1 lb  bag or 2 bags of 7 oz frozen Shredded Cooked Pork Skin (available at Asian grocers in different sizes) 
1 tbsp roasted Whole Peppercorns
1 teaspoon Ground Pepper
12 tablespoons (3/4 cup + 2 tablespoons) Sugar
3 tablespoons Smirnoff Triple Distilled Vodka 
3 bags of Nam Powder Seasoning Mix (available at Asian grocers)
Thai chile, sliced into small pieces
1 head of Garlic, thinly sliced
13 x 9 inches Quarter Baking Sheet
*
Preparing Meat  and Meat Mixture

Beef - choose beef that has the leanest cuts of beef  such as eye round, top round, round tip, top sirloin, bottom round, top loin, and tenderloin. You can also get extra lean ground beef  which has 95 percent lean at any supermarkets then ground two more times.

Pork - choose the leanest pork cuts, look for the word “loin” in the name, such as pork tenderloin or sirloin chop.  You can also get extra lean ground pork then ground two more times.

Shredded Pork Skin -  Rinse in salt and water, then rinse a few more time with water. Squeeze out excess water and allow to dry. Cut into about 2 inches strings. 

In a large bowl, combine the pork or beef,  pork skin, sugar,  ground pepper, whole peppercorns, wine, and the seasoning mix except those little bags you find inside the seasoning mix  bags. Mix really well with your hands (you might need to use plastic gloves). 


Add those little bags of seasoning mix and continue mix it until it gets  sticky and all the mixtures distribute evenly. 


Line a baking sheet with plastic wrap.  Spread the mixture in a baking sheet.  If you have another quarter baking sheet, put it on top of the mixture baking sheet and press it down until it's packed and evenly.   Cover it up with another plastic wrap and aluminum foil.  Place it at a cool place and allow it to cure for at least 2 days.  If it's pork nem chua, it will take at least an extra day to cure.


When done, the beef Nem Chua will turn red and the pork Nem Chua will have a light pink color.  Slice Nem Chua  into small sizes.  Place a piece of chili pepper and a slice of garlic on top of Nem Chua then wrap each individually with plastic wrap or banana leaf.  Store in the frigde to keep it from getting extra sour. 


I wrapped a few in banana leave which I much prefer because of  its aroma, but for the sake of time and convenience, I switch to plastic wrap instead. 


Enjoy!

Tuesday, January 25, 2011

Dưa Món (Pickled Vegetables in Fish Sauce)

 
"Tết Tết Tết ... Tết đến rồi
Tết đến trong ... tim mọi người..."
 

With the arrival of Spring every year, every family in Vietnam shares the same food that have come to symbolize Tết.  Dưa Món is one of these symbols that can't be missed.    It has the aroma, flavor and sweetness of fish sauce and sugar; the crunchiness of papaya and daikon compliments the beautiful vivid color of carrots.    Dưa món pairs best with  bánh chưng, bánh tét (traditional Vietnamese steamed cakes) and other cold dishes such as chả lụa (Vietnamese ham), and giò thủ (Vietnamese head cheese).

This is my first experiment on Dưa Món  and thankfully it did not disappoint.  So I am very excited about sharing this post with everyone.  
* * *
*
RECIPE: Dưa Món

*
Ingredients


4 Carrots, peeled with a slicer
1 Green Papaya, peeled, seeded
1 Daikon, peeled
4 cloves of Garlic, peeled, thinly sliced
2 1/2 cups Sugar
2 1/2 cups  good Fish Sauce such as Three Crabs Viet Huong brand
A Glass Jar with Lid
*
Method 


Cut daikon, carrots and green papaya into sticks or flower shape.  Wash the vegetables with the salt then rinse under cold running water.  Drain and pat dry.


Preheat the oven to 250 F.

Spread the vegetables on baking sheets. Place in the oven on the 2nd lowest rack and leave the door ajar. Let dry out for about 2-3 hours, toss the vegetables every 30 minutes. The vegetables are ready when they have shrunk by two thirds. Remove from the oven and allow to cool completely. 


Bring a pot of water to boil. Place dried vegetables in the pot and turn of the heat. Let it sit for a few minutes then drain, rinse with cold water and pat dry.  This step is optional.  I didn't want to wait for a week to taste it as it takes time to absort the liquid and unshrink.  Soaking it in hot water would help to unshrink it and it will absord faster. 


During the drying process, bring fish sauce and sugar to near boil. Make sure to stir it in the process and keep your eyes on it since it can boil quickly. Remove from heat. Let it cool completely.


 Place dried vegetable and garlic in a jar. Pour the fish sauce mixture into the vegetable jar and close the jar tightly.  Dưa Món should be ready to eat in a couple days. 

  
♥ ♥ ♥

Giò Thủ (Vietnamese Head Cheese)


"...Mừng ngày Tết trên khắp quê tôi
Ngàn hoa thơm khoa sắc xinh tươi
Đàn em thơ khoe áo mới
Chạy tung tăng vui pháo hoa..."

No, these are not Yankee Candles.

Giò Thủ is one of the popular dishes that we usually see during Tết.   When we were in Vietnam, my mom always bought and prepared lots of food a week before the arrival of the New Year since food plays a large part in Tết celebration; she makes sure that there would  plenty of food  to last us for at least three days since it is taboo to work or cook during the first three days of Tết.  It also would be bad luck otherwise to not have enough food at the beginning of the year. On the morning of the first day of the New Year, I  would hurry down the kitchen to taste all the wonderful dishes such as nem chua  (cured/fermented pork), chả lụa (Vietnamese ham), lạp xưởng (Chinese sausage), thịt kho trứng  (braised caramel pork), bánh chưng, bánh tét (traditional Vietnamese steamed cakes), bún măng vịt (bamboo shoot and chicken noodle soup), củ kiệu  (pickled spring onions), dưa món  (pickled vegetables in fish sauce) and of course giò thủ


Giò Thủ originated from the northern region. Its name is unique to the north. Giò ̣̣̣̣̣̣̣̣̣̣which is usually known as Chả in the other regions of Vietnam is a meat patty or roll.  Thủ refers to the head of the pig. Giò Thủ is translated as head cheese though it's not made out of cheese but a gelatinous meaty roll made from the various parts of the head of a pig. This gelatinous head cheese is made of pig tongues, snouts, ears and cheeks which  are the main ingredients, flavored with garlic, scallions, onions, black fungus, fish sauce and black pepper then  simmered to produce the gelatinous meat. When cooled, the meat congeals because of the natural gelatin.  Traditionally, giò thủ  is wrapped in banana leaves and compressed in a  mold until the gelatin from the various parts of the pig causes it to stick together.


Giò Thủ is definitely an acquired dish. I love the marble texture and the crunchy cartilage with every bite.  It is a delicious, chewy, crunchy, meaty dish embodied with a deep, spicy, strong flavor from the fragnant garlic, scallion and black peppercorns; it's paired well with pickled vegetables in fish sauce (dưa món), and a cold beer. Giò Thủ is one of those cold dishes best enjoyed and not revealed; this is where ignorance is truly bliss I suppose.
* * *
*
 RECIPE: Giò Thủ

*
Ingredients

4 Pig Ears
2 Pig Tongues
2 Snouts or Cheeks or both
1 1/2 tbsps Fish Sauce
1 1/2 tbsps Sugar
1 tbsp Salt
1 tsp ground pepper
2 tbsps  roasted whole Peppercorns (tiêu hột)
1 cup shredded or whole Black Fungus (nấm mèo) soaked for about 20 minutes or until soft and drained
Cooking Oil
 6 Cloves Garlic, minced (make about 2 1/2 tbsps minced garlic)
2 Shallots, minced
1 medium Onion, for boiling meat
1 tbsp Salt, for boilling meat
2 tbsp Sugar, for boiling meat
2 tablespoos of Salt, for cleaning the meat
1 cup Vinegar, for cleaning the meat
2 empty medium size round tin cans (empty fruit cans) and plastic sandwich bags
*
Preparing Meat

Clean the pig ears, tongue, snout with water, salt and vinegar thorougly.  Rinsed.
Boil meat  in a large pot with onion, sugar and salt  for about 45 minutes or until you can poke a choptick through the pig ears, tongue and snout . Drain and rinse cold water until cool. This will prevent the skin of the pork from turning color.
Cut the pig ears thinly. 
Discard the  thin white layer on top of the tongue by using the slicer to slice it. Cut tongue thinly.
Certain part of the snout might still has hair, so be sure to shave it clean.  Cut snout thinly.


Mix the meat in a bowl with  ground pepper, whole peppercorns, sugar, salt, fish sauce and fungus.


In a large pan, heat a  couple  tablespoons of cooking oil and saute the shallots and garlic until it becomes fragnant.  Add the meat mixture and saute until you notice the meats become viscous sticky, usually about 10 minutes. 
Molding the Mixture


Use the Giò Thủ molding just like the one I have or use empty ridge-free walls fruit cans such as the jackfruit or lychee cans. Line the cans with  sandwich bags and tightly pack the cans with the mixture.  Every spoon of mixture you add in the mold, press it down firmly to compact the mixture. Close the bag then place something heavy on top to compact the contents further.  Store in the fridge overnight.

Remove it from a mold and wrap it up in banana leaves or plastic wrap and aluminum foil. 


* * *
*
***I went to the grocery store just to get ears and tongues which are the only two parts of the pig head that I usually use to make Giò Thủ, but then I saw packages of snouts and cheeks. Since it's "giò thủ", so what the heck...I bought everything.

Thursday, January 20, 2011

Mứt Tắc (Candied Kumquats)


My mother-in-law's friend gave her a bag of home grown Kumquats. These Kumquats are beautiful as they are grown as ornamental plants. The kumquat fruit is orange and has a glistening rind; the shape can be round or oval and unlike the orange, the sweetest part is the rind. The inside is quite acidic and sour.


Since Tết (the Vietnamese Lunar New Year) is fast approaching in a couple weeks, I planned to make a few traditional dishes to celeberate Tết, the first being Mứt. Hence the arrival of these Kumquats was impeccable. Mứt is one of those dishes that can't be missed at Tết, so I decided to turn these beautiful but sour kumquats into Mứt Tắc (Candied Kumquats). 

Just like candied orange and grapefruit peel, Candied Kumquats are also easy to make. They pair well with hot green or black tea as I learned from my husband, but watch out, you will be addicted to these. The jar I just made is already gone. I guarantee you won't just try one! 
* * * 
RECIPE: Mứt Tắc 


2 pounds yellow Kumquats
(choose the ones that are bright yellow with smooth skin)
12 cups (3 liters) Water
1 1/2 tablespoons Salt
3 cups Sugar
1 teaspoon Vôi Ăn Trầu loại Trắng (White Lime Stone Paste)

Directions

Preparing Kumquats


In a bowl, mix 6 cups of water with lime stone paste. Let it settle for a while until the water becomes clear. Transfer the clear water to another bowl. Discard the lime stone paste sediments. 


In another bowl, mix 6 cups of water with salt, set it aside.
With a pairing knife, make a few eyelet cuts into the rind of the Kumquat. 


Discard any seeds by squeezing it. Keep the juice for the simmering process later.


Soak Kumquats in salt mixture. Most of the recipes recommends peeling a thin layer of the Kumquat rind but this process is so time consuming, so I will leave this up to you to decide. 


Transfer the Kumquats to lime stone paste mixture and soak it for about an hour. The benefit of lime stone paste is to make the Kumquats shiny and translucent . Rinse with cold water. Gently squeeze the water from each kumquat.
Simmering Kumquats


In a pot, mix sugar, Kumquats juice and Kumquats then heat over high heat until it comes to a boil. Reduce heat to low and simmer for about half an hour or until the kumquats become more translucent. During the simmering process, use a spoon to splash the syrup from the pot onto the Kumquats. 


Use slotted spoon to remove the Kumquats. To create flower shapes, press a Kumquat down with your thumb and index finger. Allow it air dry on a baking rack or arrange it on a baking pan and dry it in an oven, 2nd lowest rack at 200 degree for about an hour. If you have parchment paper, line a baking pan with it to prevent the syrup sticks on the baking pan.


Ăn Ngon!