Vietspices Search

Wednesday, December 14, 2011

Bánh Khoai Môn Pie (Taro Pie)


I hope everyone had a food-filling wonderful Thanksgiving.  My family's Thanksgiving was stuffed with lots of laughter and love from our family and friends.


If you have been following my  facebook page, you would've seen what I had prepped and planned for the Thanksgiving feast.  I had prepared ingredients for 15 dishes but was only able to get 14 dishes on the table by the next morning.  Not too bad I supposed.


steamed black rice with preserved duck eggs, diced carrots and chinese sausage

Roasted Ducks


We had lots of main dishes, appetizers and side dishes but there was a shortage of desserts.  Thanks to my sister-in-law who brought over a couple of homemade taro pies.  Everyone was eager to try it out as we haven't had taro pie in our lives ever.    It was simply delicious!  Though I'm usually not much of a sweet tooth and don't care much for desserts, I must say I thoroughly enjoyed the taro pie.    I always love to study and work with these ingredients that are representative of Southeast Asia and taro is definitely one of my  favorite.


 I got the recipe from my sister-in-law and adjusted the recipe a little bit to my taste. Since then, I've been hit with baking fever and have been making taro pies 2-3 times a week!

My sister-in-law used store-bought pie shells as it saves half the time but I prefer to make it from scratch.  Pie shells can be bought at any American grocery stores and they are inexpensive (about $3 per package for 2 shells).   Taro root can be found at most Asian supermarkets.  I love the nice starchy, sweet, and mild flavor of the purplish taro and even more so when it's surrounded by a deliciously rich and buttery flavored pie crusting. This would make a nice dessert to pair with hot green tea or coffee to go with the holiday spirit.   
* * *
*
RECIPE: Bánh Khoai Môn Pie (Taro Pie)

*
Ingredients

*
For Taro Filling
2 pounds of Taro roots
3 Eggs
1 1/2 cups Sugar
4 tablespoons All-Purpose Flour
2 cups Whole Milk
1 teaspoon Pure Vanilla Extract

For Pie Shells (make two 9-inch pie shells)
2 1/2 cups All-Purpose Flour
1/2 teaspoon Salt
3 tablespoons Sugar
1/4 cup Vegetable Shortening, cold
1 1/2 stick Unsalted Butter (12 tablespoons), cubed and cold
2/3 cup Iced Water
*
Making Pie Shells


Cut butter into cubes and keep butter cubes and vegetable shortening cold in the fridge.


In a large mixing bowl or a clean surface, mix flour, sugar and salt well.


Add the shortening and break it up with your hands as you start to coat it up with the flour.


Add the cold butter cubes and work it into the flour with your hands quickly, so the butter doesn't get too soft, until the mixture is crumbly.


Sprinkle in water, a little at a time and mix it with your hands until the mixture comes together forming a dough. Pack the dough together into a ball.


Divide the dough in half and flatten it slightly to form a disk shape.  Wrap each disk in plastic wrap and chill in the refrigerator for about 30 minutes before rolling out.


Unbaked pie dough can be kept in the refrigerator, tightly wrap with plastic wrap and foil, for about 4 days. Let it soften a bit at room temperature before you roll it out. It can also be frozen for at least 3 months. 
*
Making Taro Filling


Cut taro into big chunks.  In a pot, cover taro with just enough water and bring it to a boil.  Reduce heat and cook for about 15-20 minutes or until the taro is cooked.

Discard the water and place taro in the food processor and puree until a fine paste is formed.  Transfer taro into a mixing bowl.


Beat eggs lightly  in a separate bowl.  Combine eggs and the remaining taro filling ingredients in taro mixing bowl.  Mix well and set aside.


*
Putting Taro Pie Together


Preheat to 350 degrees.

On a lightly floured surface, roll each disk out into an 11 or 12-inch circle, 1/8-inch-thick using a flour-dusted rolling pin; ultimately this is used to make a 9-inch pie.


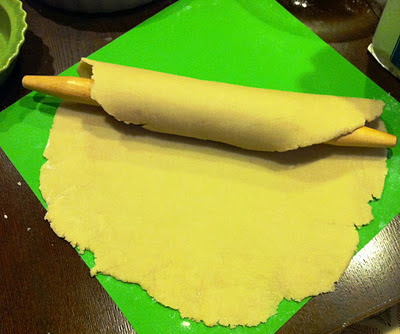
Roll the dough onto a rolling pin to facilitate transferring into a 9-inch pie pan.   Gently fit the pastry into the pan without stretching it; let it hang over the edge.  Add taro filling.


Roll up the overhang and pinch the edge with your thumbs and index fingers into a fluted rim. Brush egg yolk over the fluted rim.


*
Baking Pie


Bake the pies for 30-40 minutes or until a toothpick inserted in the middle of the pie comes out dry.  Cool before slicing.  


Happy Holidays! Enjoy!

Tuesday, November 29, 2011

Dầu Hạt Điều (Annatto Oil)


Vietnamese cuisine often use annatto oil to enhance a dish with its taste and the vibrant color. Annatto seeds release a beautiful orange color when added to hot oil, but it also adds warm, rich flavor to your dishes. The oil imparts a slightly peppery scent with a nutty hint. 

Annatto shrub with flowers and fruits
http://www.uni-graz.at/~katzer/engl/Bixa_ore.html

Annatto seeds sometimes called roucou or achiote, can be found at spice markets, Asian markets, and in the Mexican foods section of some grocery stores.


If you want to read more about annatto seeds, click on this link: http://en.wikipedia.org/wiki/Annatto


I use a lot of annatto oil in my cooking. I often pre-make a jar of annatto oil and keep it at room temperature for a a few weeks. 

To make annatto oil, add 2 tablespoons of  oil and 2 teaspoons of annato seeds in a saucepan and bring the heat to medium.


As the temperature rises, the red color will leach from the annatto seeds.  The more annatto seeds added to the oil, the deeper of color you will get.
Remove the saucepan from the heat and let stand for a minute. Strain and discard seeds.


Monday, November 21, 2011

Bánh Canh (Banh Canh Noodles)


I started to make fresh bánh canh when I was in High School. At that time, I was still pretty much a newcomer and there were many things that I needed to adapt to including the popular food. I still recalled how difficult it was for me to eat pizza, hotdog, chili, and hamburger. Though my mother cooked wonderful Vietnamese food, I often found myself in the kitchen making a small batch of bánh quai vạc, bánh canh and bánh bao to sastify my craving for Vietnamese food.

Before I launched this blog, my style of cooking was based on eyeballing everything, especially when it came to making the dough for bánh quai vạc, bánh bao or bánh canh

Recently, I  tried this bánh canh recipe again. This time I measured all the ingredients and revealed step by step the details  to my blog fans so that they can try this delicious dish  at home.

One caveat, creating the right dough can be very tricky. I  tried three batches back to back with the same total amount of flour but different ratio of  rice flour and tapioca and each batch gave me a different result; one batch was too mushy and I had to keep adding more flour; another was a little bit dry and so I had to add more boiling water. The more tapioca added, the more chewy the noodles will be.  To create a less chewy noodles, add more rice flour but too much rice flour can create harder noodles.   So be prepared to adjust the amount of boiling water added to the flour mix  as this will change depending on  the ratio of flour used. 

The recipe below is the best bánh canh texture I came up with.  I hope you have better luck of making bánh canh with the exact measurements.  I will update this post when I have a more consistent approach to creating the perfect bánh canh dough using a potato ricer.

*
RECIPE: Bánh Canh (Banh Canh Noodles)
*
Ingredients


2 cups Tapioca Starch
1 1/2 cups Rice Flour
1/2 teaspoon Salt
about 1 1/4 cups Boiling Hot-Water
*
Directions

Making Bánh Canh


Place tapioca flour, rice flour and salt in a mixing bowl and mix it well.  
Pour boiling hot-water into flour slowly (make sure the water is boiling. Hot water will not work).  Use spatula to mix it up since the flour is very hot and it can burn your hands. Knead flour while the flour is still hot until dough is soft and it doesn't stick to your hands and the mixing bowl.

Dough that is relatively dry will be too thick and too difficult to press through the plate. If the dough is dried, add a little bit more of boiling hot-water to soften the dough so it can be easy to press through the plate. Add some extra flour if the dough is too tacky. How much water all depends upon your brand of flour, how old it is, and the temperature and humidly of the room.


Wrap dough in a plastic wrap then aluminum foil to keep dough from drying out. Let it rest for about 5 minutes. 


On a clean work surface, dust a little flour and take your dough mixture out and roll it flat.


Cut it into thin stripes and separate noodle strings with a little bit of flour immediately to prevent from sticking together.

To speed up the cutting process, dust flour on the surface of flatten dough, fold it up and cut. 


Noodles can be stored in the fridge for a few days or in the freezer for a long time.


When making bánh canh soup, bring a pot of water to a boil. Add the raw noodles into the boiling water. Cook for a few minutes until the noodles become transparent and float to the surface. Drain and rinse. The purpose of cooking the noodles before adding to the broth pot is to prevent the broth from turning cloudy and viscous due to excess flour.

click here for Bánh Canh Cua recipe

click here for Bánh Canh Chả Cá recipe
*
Eat Well!

Thursday, November 17, 2011

Chim Cút Rôti Chiên Giòn ( Deep Fried Quails)


Thanksgiving is approaching fast and I couldn't wait to prepare fresh homemade meals for my family.  I told my husband that throughout this week, I will serve him Thanksgiving dishes everyday . . . only for him to have seconds on Thanksgiving day.

Every Thanksgiving I would start out in the kitchen from the early morning.  The first order of business,  bake a turkey.   I would cook up at least eight dishes plus desserts to feed the whole army which includes my own family, my husband's brother's side of the family and our friends.  Our traditional Thanksgiving and Christmas meals usually start at noon and end late at night after the dinner. A full day fulfilled with good food, love, warmth and gratitude.

Usually on Thanksgiving day, I'm usually steeped with the preparation that I can't blog. This year, I decided to make my favorite Thanksgiving dishes a head of time to share with my blog readers through my Facebook page.  Thanks to my family who is willing to sacrifice their normal meals so that I can achieve my plan.

If you haven't checked it out yet,  head over there for more food: http://www.facebook.com/TheSpicesOfLife

One of my favorite dishes to serve on this holiday season is Chim Cút Rôti (deep fried quails).  I like to serve Chim Cút Rôti with mashed potatoes or black rice  (xôi nếp than) with Chinese sausages (lạp xưởng) and thousand year eggs (trứng bắc thảo)  and a side dish of pecan butter sweet potatoes. Quails marinated with some of my favorite ingredients like garlic, shallots, curry powder and five-spice powder give this dish a full, wonderful aroma.
*
RECIPE: Chim Cút Rôti Chiên Giòn (Fried Quails)


*
Ingredients


For  Fried Quails
A pack of 6 Quails, washed thoroughly with salt, pat dried with paper towel
2 tablespoons chopped Garlic
2 tablespoons chopped Shallots
1/4 cup Soy Sauce
1/4 cup (4 tablespoons) Brown Sugar
3 tablespoons Oil
1/2-1 teaspoon Pepper
1 teaspoon Five Spice Powder
1/2 tablespoon Curry Powder
Oil, for deep fry
*
Making Fried Quails


Combine the marinate ingredients together in a bowl and mix well.  Add quails to marinate and leave to marinate for at least 1 hour or overnight  in the fridge.


Put oil in a wok or a saucepan over high heat. To tell when oil is hot enough for deep frying, dip a chopstick l into the oil as it heats up. If the oil starts to bubble steadily, then the oil is hot enough for frying. Reduce the heat to medium low. Remove the quails from marinate and fry the quails for 5 minutes or until crisp and golden. During the frying process, use a strainer to remove the marinated garlic and shallots and save it. Remove quails from oil then place onto paper towel. Brush quails all over with melted butter for a glossy finish and enhanced flavor.
*
Making Roti Sauce

In a saucepan, cook the left over marinate sauce over medium heat for about a couple minutes.  Add the fried marinated garlic and shallots.  Pour into a small bowl and serve it as a roti sauce.  Last year, instead of deep frying, I seared the marinated quails then combined the roti sauce with the quails and baked, then broiled for the last couple minutes.
*
Presentation


Enjoy quails with a mixture of salt, pepper, and lime juice dipping sauce.
*
Have a warm, sweet, joyful Thanksgiving!